Installing and setting up the RTK BASE
Quick Checklist
- Register the RTK BASE on an RT Cloud account and set up the NTRIP settings
- Attach the supplied GNSS antenna to “GPS” on the rear of the unit.
- Insert a SIM card
- Attach a 4G LTE antenna to “4G Main” on the GNSS2 (whether using corrections over 4G LTE or not)
- Supply 12V power to the GNSS2.
- Configure the RTK Base for relevant correction outputs (all are set by default) and email address for status
Full Instructions
From initial installation to full setup and correction output from the RTK Base takes around 30 hours. The system performs a survey for 6 hours but the service which is used to provide the accurate absolute position is not available until 24 hours after the measurements are taken.
Before the RTK Base can be used it must be registered to an RT Cloud account. For details on how to do that see here.
The RTK BASE must also be configured to provide the corrections. In the Use NTRIP Config: select an GPS NTRIP setting which is not used and set up to Use Race Technology’s Caster. If this base station data is to be shared with other RT Cloud accounts, then a user ID and Password can be set on here to enable access to the base station data by other users.
Any RT Connect units on the same account must be set to use the same NTRIP Config.
In the account settings, make sure that an email address is set up, this will receive notifications about any issues with the system.
The RTK Base is supplied with a high quality pinwheel antenna, this should be mounted on a pole outside where it won’t move and will have a good view of the sky. This must be connected to “GPS In” on the rear of the unit. The supplied 4G LTE antenna must be connected to the 4G Main connector.
NOTE: A 4G LTE antenna should always be attached to the RTK BASE whenever it has power.
Insert a suitable data enabled SIM card and connect the 12v power. Turn the unit on.
Connect the unit to a computer using the serial port and open up the RTK BASE configuration software.
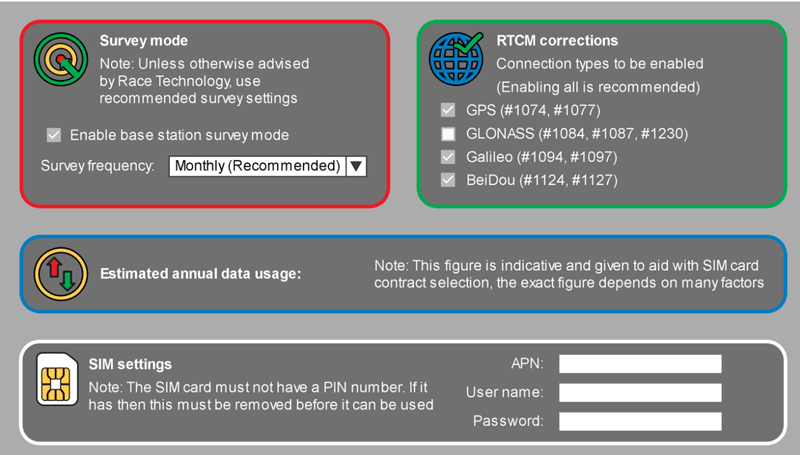
Most SIM cards do not require any setting up, but if required the APN for the SIM card can be set up here, along with the optional settings for the RTCM corrections. Enabling all corrections is recommended.
Connect 12V power to the rear of the unit using the supplied cable.
Check the status messages on screen 1 and on emails to ensure that the unit is operating correctly.