Displayng Gears
Displaying gears is achieved by using a numerical control and associating it with the Gear variable.
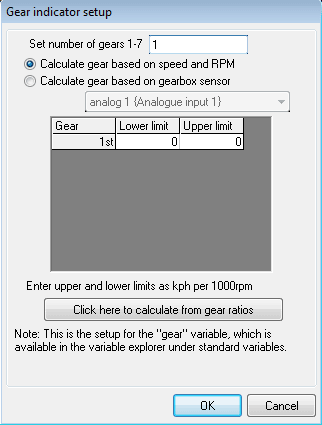
Gear variable is a special variable that returns the current gear you are in. it is located under the standard tab of the variable tree. To return the correct gear, variable should be configured through the Gear Indicator Setup dialog
(Configuration -> Gear Display).
Following section describes how to configure the gear variable through this dialog.
How do I set up the gear variable
This section describes setting up Gear variable using the following two methods.
- Using the internal gear box sensor
- Using the speed and rpm data to calculate the gear
Using the internal gear box sensor
1. Attach the internal sensor to any one of the analog input channels from 1 to 16 on your data logger.
2. Open the Gear Indicator Setup dialog using the Configuration -> Gear Display menu command.
3. Enter the number of gears present in your vehicle in the Set number of gears box.
4. Select the Calculate gear based on gearbox sensor option
5. Select the Analog input where the gear box sensor is attached.
6. Enter the lower and upper voltage limits for the gears in the appropriate boxes.
5. After setting the gear sensor voltages, press OK to save the settings.
7. Add a Numerical display to your design and associate it with the gear variable. (drag and drop the Gear variable from the variable tree on to the control)
8. Save your configuration. Then Send the new configuration to the DASH4PRO unit.
9. Check whether all the gears are displayed correctly. If not check the voltage limits for the gears.
Using the speed and rpm data to calculate the gear
If your gearbox does not have a gear position potentiometer, you will need to set up the gear variable based on the speed and RPM.
1. Open the Gear Indicator Setup dialog using the Configuration -> Gear Display menu command.
2. Enter the number of gears present in your vehicle in the Set number of gears box.
3. Select the Calculate gear based on speed and RPM option
4. If you already know your kph per 1,000 rpm values, enter them in the appropriate boxes. For road cars and motorcycles the figure for kph/1000rpm is typically given in the owner’s manual.
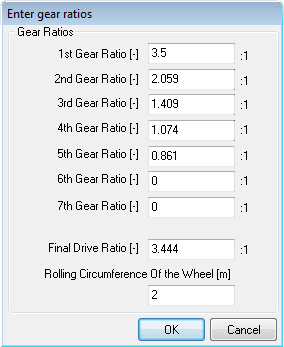
5. If kph/1000rpm information isn’t available click the click here to calculate from gear ratio button at the bottom of the window. This will bring up Enter Gear Ratios dialog. This dailog allows you to enter the ratios, final drive, and rolling circumference of the wheel.
To find the gearbox gear ratios, and the final drive (differential) ratio, you may need to look in your vehicle operation manual, or use the internet to search for the information.
6. Enter gear ratios in the boxes provided.
7. Now enter the final drive ratio.
8. Finally, enter the rolling circumference of the wheel. It is just the distance it takes for the wheel to do one complete revolution while in contact with the floor.
9. press "OK" button to save gear ratio settings and exit from the dialog.
10. The Gear indicator setup dialog will now contain the calculated values.
11. Add a Numerical display to your design and associate it with the gear variable. (Drag and drop the Gear variable from the variable tree on to the control)
12. Now transfer the configuration to your DASH4PRO.
13. Check whether all the gears are displayed correctly. If not check the gear ratio values and other settings.


