Installing the unit
Mounting
As the DL1 CLUB contains accelerometers, it is important that the unit is mounted on a flat, fairly level surface in the vehicle. A small amount of tilt can be compensated for in the software, however, large tilt angles cause loss of resolution and increased noise due to vertical vibration. Click here for instructions on compensating for accelerometer tilt.
Just as importantly, the logger must be mounted "squarely" in the vehicle with the button facing towards the back of the vehicle. If the unit is mounted at an angle to the direction of travel for the vehicle, then the unit will be measuring longitudinal accelerations when you are cornering and vice versa. Acceleration errors caused by mounting the unit at an angle to the direction of travel cannot be compensated for, so it is important to get it right.
or most installations the unit will be mounted using 2 strips of scotch lock tape on the base of the unit. This is simple and secure and allows the unit to be moved quickly between different vehicles. If a more permanent installation is required then there are two main options available:
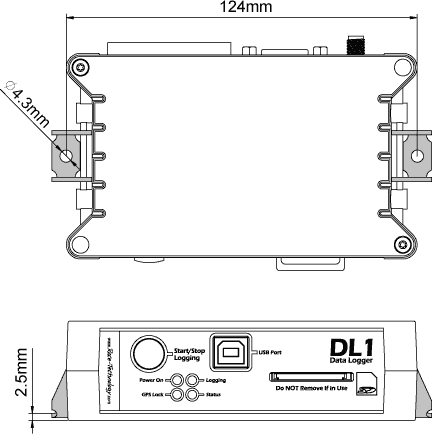
1. You can use either the mounting holes on the side of the unit. These are designed to take 2.9mm self tapping screws (No. 4) with a maximum penetration depth of 6.5mm.
2. Or a set of "hook in" brackets are available that fit into the channels on the sides of the case . They are made from brushed stainless steel, and are designed to be used with M4 screws or similar diameter self tapping screws (#7 or #8). The mounting diagram for these is shown below:
Bracket Mounting
Power
The DL1 CLUB Unit is supplied with a cigar lighter based power supply. The centre pin connects to +12V and the outer connects to the vehicle ground. This method is convenient if you are temporarily connecting the unit to the vehicle (typically on a road car).
If you want to permanently wire the DL1 CLUB Unit directly into the engine wiring loom, rather than using the cigarette lighter socket, then you must use a fused supply with a fuse rating of no more than 1 amp. It is also highly recommended that the unit has it's own external power switch so it can be easily turned off. This is to prevent any draining of the battery, or any damage to the unit when the engine is turned on or when the car is being cranked over. It is recommended that you only turn the unit on once the engine is running. It is possible that leaving the DL1 CLUB turned on during cranking may corrupt the data in the logger.
Also please note that in all cases the GPS receiver is powered on whenever there is power to the main unit - it does not turn on and off with the main unit, so if the DL1 CLUB is left connected to the battery it will flatten it.
Alternatively, the DL1 CLUB can be powered from a separate battery if required - this is often appropriate for temporary installations where a cigar lighter is not available. The DL1 CLUB requires a minimum of 10v and draw about 100mA-200mA, so the size of the battery should be chosen to give sufficient run time. For example a 1Ah battery would give about 5 hours operation. Because of the current supply requirements only rechargeable batteries should be used, you cannot use disposable batteries. If you do require a battery pack, Race Technology keep a wide selection in stock - call us with your requirements.
Start the vehicle, wait a few seconds then connect the power lead to the unit. After a few seconds, the "Power" LED will come on and when the unit is ready to log the "status" light will flash. Wait for a few minutes to enable the GPS to obtain a good positional lock. Once the receiver has a lock, the GPS status light on the DL1 CLUB will start flashing.
Further reading
For more information, click on the following links:

