USB Programming Lead Quick Start Guide
Thank you for purchasing this Race Technology product. The procedures and connections for using the USB Programming Lead differ from the procedures documented in the software. Please follow the instructions below to configure the AnalogModule8 or DASH4PRO products using the USB Programming Lead.
Driver Installation:
When first plugging the USB Programming Lead into the PC’s USB port, Windows will look for and install the correct driver for this hardware. This process may take several minutes while it searches for the correct driver. This driver installation operation is only required the first time it is connected.
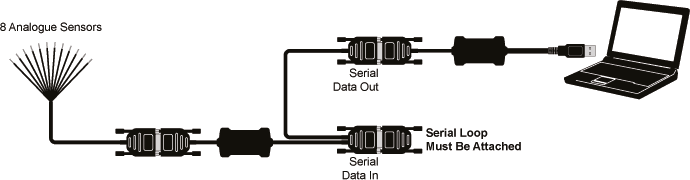
AnalogModule8
- Connect the “Serial Data Out” of the AnalogModule8 to the D-type connector of the USB Programming Lead.
- Connect the “Serial Loop” to the “Serial Data In” port of the AnalogModule8
- Then connect the USB connector to the PC’s USB port.
- Using the AnalogModule8 configuration software, select the correct USB port in the “Communications” box.
- You are now connected - Read back or send a configuration to the device using the software.
‘’’Note:’’’ The analogue sensors part of the loom does not have to be connected for configuration.
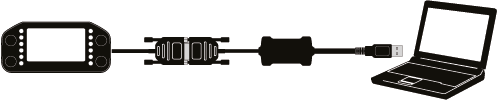
DASH4PRO Display
- Connect the D-type connector of the DASH4PRO to the D-type connector of the USB Programming Lead.
- Then connect the USB connector to the PC’s USB port.
- Using the DASH4PRO configuration software, select the correct USB port in the “Communications” box.
- You are now connected - Read/send a configuration or update the device’s firmware using the software.