How do I set up the gear indicator on the DASH2?
There are two ways to set up the gear indicator on the DASH2.
Firstly, if the gear box of the vehicle that you are monitoring has an internal sensor (this is most likely to be the case on a motorcycle or racing car), then you may set up the gear indicator directly from the DASH2. Attach the internal sensor to connector 1 on the DASH2, using pin number 9 (analogue input 1) and pin 6 (ground):
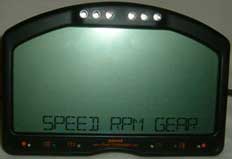
step 1: Select "SPEED RPM GEAR" from the main menu.
step 2: Now, continue pressing select until you arrive at "Ana gears". Set it to "on".
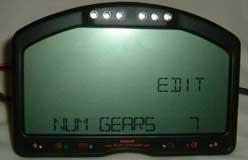
step 3: Next you will be asked how many gears are present. Here, enter the number of forward gears. The unit will automatically add on for reverse and neutral.
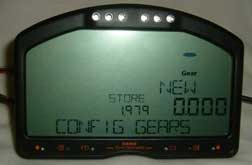
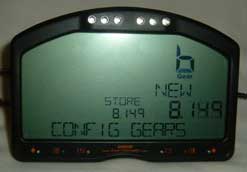
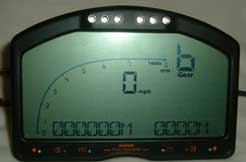
step 4: After setting the number of gears, the display will change. It will now show three things - the gear that is currently being edited, “STORE” (which is the stored reading for the current gear), and “NEW” (which is the current reading on the analogue input).
step 5: To set up a particular gear, use the UP and DOWN buttons to select the required gear and then press the SELECT button to store the reading. The value from the NEW window will now appear under STORE, showing that the upgrade has been completed.
step 6: When you have finished setting up the gears, press the MENU button to exit and store the readings.
N.B. The DASH2 rounds off to the nearest gear. For example, if gear 1 is set to 3v and gear 2 is set to 4v and voltage reading between 3.00 and 3.50 will be gear 1.Similarly, any reading between 3.51v and 4.00v will be gear 2.
If, however, you gearbox does not have a gear position potentiometer, you will need to set up the gear indicator using the DASH2 configuration software:
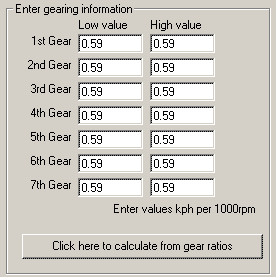
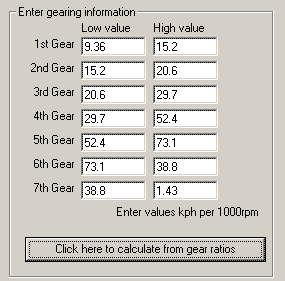
step 1: Enter the DASH2 configuration tool and click on the "Gear indicator" tab. If you already know your kph per 1,000 rpm values, then you may now enter them in the appropriate boxes. Otherwise click on the bar at the bottom of the window to calculate the values from gear ratios.
step 2: This will bring up another window. Enter your gear ratios in the boxes provided.
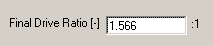
step 3: Now enter the final drive ratio.
step 4: Finally, enter the rolling circumference of the wheel (the distance that is travelled every time the wheel makes one revolution), and press "OK"
step 5: The Gear indicator tab on the configuration tool will now contain the calculated values. Now transfer the configuration to your DASH2, either via a a serial connection or an RT data logger.
N.B. When configured in this way, no readings will be given for the reverse gear.