Dual Antenna INS Mounting Instructions
Mounting Position
It is STRONGLY recommend that you mount the INS antenna assembly on the roof of the vehicle. Mounting the antenna on the bonnet or the boot of the vehicle will give suboptimal results due to the reduced number of satellites in view. This is particularly important due to the fact that any deviation in vehicle heading will change the satellite constellation used.
Fig1. INS antenna assembly mounting position side view
Fig2. INS antenna assembly mounting position top view
For best results the INS antenna assembly should be mounted as close as possible to the centre line of the vehicle.
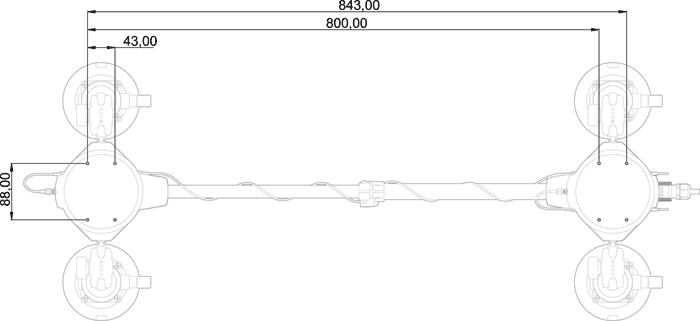
The telescopic centre section must be fully extended to obtain the most accurate results, and the D-type connector must be facing the rear of the vehicle (direction of travel arrows are engraved on the unit).
Fig3. Suction pad mounting indicator. Pump until the red line can not be seen.
The INS antenna assembly is intended for use with the supplied suction mounts. These mounts are provided with fully articulated ball and socket assemblies, which allow for the antennas to be mounted level and the suction cups to contact the roof of the vehicle effectively. The suction mounts have a red indicator line on the pump, which indicates the suction. If you can see the red line the cup is not secure. Continue to pump until the red line can not be seen. Frequently check the suction mountings to see if the red line is visible.
Final check
Once mounted check the following:
- The central telescopic section is fully extended giving an 800mm base line between the antennas.
- The D-type connector is facing the rear of the vehicle and the “direction of travel” arrows are pointing to the front of the vehicle.
- The antennas are mounted as straight and level as possible, and are aligned along the centre line of the vehicle.
- All of the articulated ball and socket arms are tightened securely and the telescopic extension clamp is locked
- All of the suction mounting cups are secure with none of the red warning lines showing.
Further guidelines
In view of the importance of the antenna mounting position, the following additional guidelines are set out below:
- The antenna must not be covered with tape
- The antenna must not be subjected to high levels of vibration. To prevent this, isolate the antenna from vibration as much as possible.
- The antenna must be physically remote from sources of electrical noise. By far the biggest source of radio interference is a gasoline engine's ignition system, so keep the antenna away from all aspects of it. Avoid the engine management system, coils, high tension leads and ignition control modules.
- Avoid trapping, pinching or kinking the antenna cables. The RF leads from the GPS antennas to the receiver are special cables and it is not normally practical to repair them. If you do trap, pinch or cut it, then the antenna cables will have to be replaced. Do not attempt to fit the antenna cable into a shut gap, or compress it with a door or window seal.
Alternative Mounting
Alternative mounting points are provided on the unit to allow it to be adaptable when required. 4 x M4 x 7mm deep mounting holes are located on the underside of each antenna assembly base as shown below. These can be used for alternative mountings such as custom brackets, magnets or full mechanical fixing. For an accurate 800mm baseline the hole dimensions are shown below:
Fig5. Alternative mounting hole positions